It’s closing in on two years now since the last blog update. Even though I haven’t been keeping content updated, I’ve still been busy brewing. Maybe a future post will spend a bit more time reflecting on all of those brews. That is not this post. This post is all about the new pilot brewing system I built over the past winter.
Incremental Updates
I’ve been brewing on essentially the same propane system for the past several years with just a few minor tweaks here and there. A few of the tweaks were a sight gauge added to my main kettle to help measure water and boil volume, a bulkhead and thermometer added to my mash tun to help monitor mash temperatures, a second propane tank for emergencies/poor planning, a new copper immersion chiller/prechiller to improve chilling.
While every change was targeted to address some identified weakness in the system and added up to a slight overall improvement, there were always parts that could never be fixed with small tweaks. I was still manually moving a lot of heavy and hot containers of water and grain around during the brew day. My boil kettle bazooka screen was prone to getting clogged during chilling and transferring. The braided tubing in my mash tun was difficult to keep clean and still ocassionally collapsed, resulting in stuck mashes. Using the propane burner meant planning around weather and wind conditions to be able to brew.
Planning
With all of these issues in mind, I started looking at my options for putting together a completely new system from the ground up. Switching from propane to electricity would let me brew inside again without having to worry about the weather or running out of gas at a critical moment. Electricity is also more efficient and generally cheaper to operate than propane. Given that I had convenient access to an unused dryer outlet in my garage, this seemed like the clear choice for the basis of this new system.
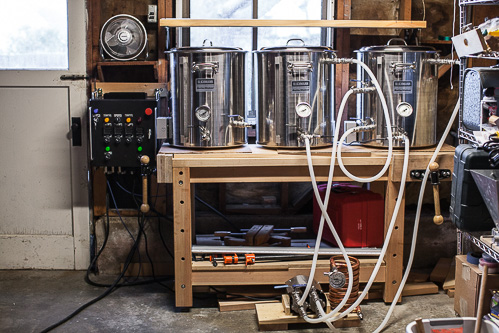
My next decision was to use a recirculating mash system for maintaining consistent mash temperatures. I was already used to working with a pump for moving liquid in other parts of the brewing process so adding a second pump for the mash stage combined with electric heating elements would hopefully be a straightfoward progression. I just needed to decide on the type of recirculating system to use. The two most common types are RIMS (Recirculating Infusion Mash System) and HERMS (Heat Exchange Recirculating Mash System). The primary difference between the two is that in RIMS the wort is directly heated while HERMS uses indirect heating.
There has been a significant amount of debate amongst homebrewers on the pros and cons of both types of recirculating mash systems. Initially, I considered using RIMS, but after further research I eventually settled on HERMS instead. The biggest impact on my decision wasn’t as much to do with the benefits of one over the other as it was the availability of clear documentation for assembling either type of system. Probably one of the very best sets of documentation for building a complete HERMS brewery from start to finish is the The Electric Brewery website.
Of course there is plenty of other prior art available online for other RIMS and HERMS builds. A huge number of wiring diagrams and other people’s build logs exist in various online blogs and forums. These can be a great source of inspiration and helpful during the research and planning phases of a project. Unfortunately, when it’s time to start building you would most likely have to piece together a system from multiple sources of information. Those sources could even be missing important steps in the build process. There’s also the risk of misinformation or trying to follow instructions written by someone who is even more clueless at what they’re doing than yourself.
On the other hand, The Electric Brewery is an incredibly detailed guide including thorough parts lists, diagrams, high quality construction photos, and step by step instructions from beginning to end. It’s also a proven system that’s known to work well and has an active community of brewers who have built their own. Having made my decision, I purchased the ebook and began planning out my build. While the same information is available for free on the website, the ebook is a handy offline version with all of the information in a single convenient PDF. It’s also a good way to show support for the site.
Modifications
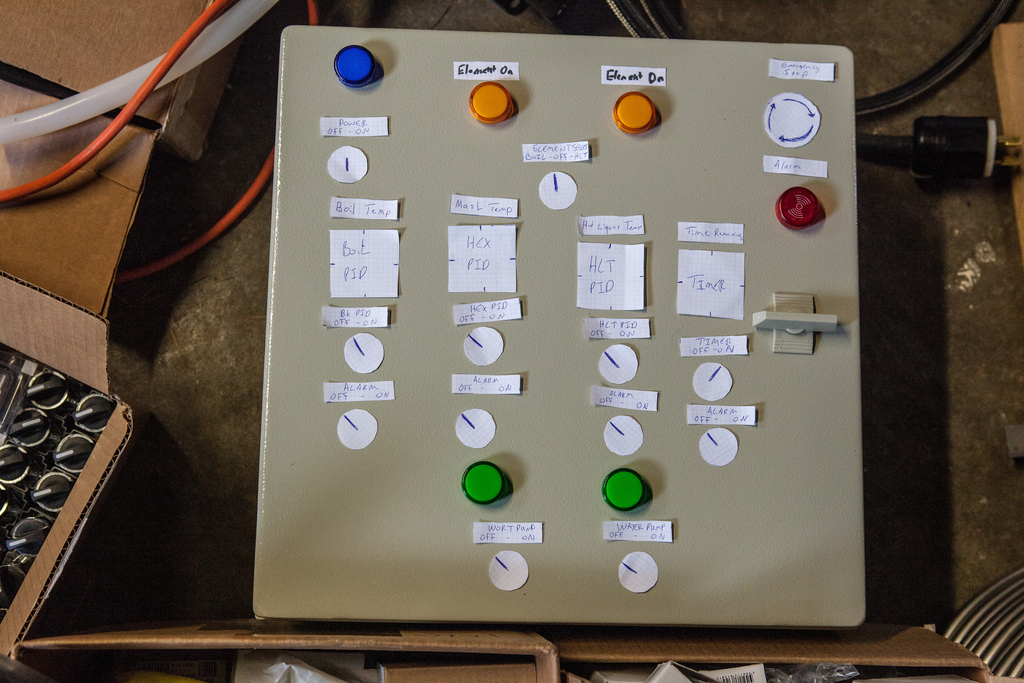
Through my planning I decided to make a few deviations from the plans in my own system. I settled on three key system changes. The first was in the front panel components. The original design included amp and volt meter displays. Many people seem to have a lot of issues getting these components initially working. I didn’t see that they added much real value to the panel capabilities compared to the hassle that might be involved in getting them to work. So I decided to simply omit them from my build. I also omitted the timer reset button and combined the alarm and buzzer indicators into a single unit. Next, I added an oversized emergency stop mushroom button. This feature is probably unnecessary overkill as an additional safety feature, but I do think it looks good. I also considered adding additional switches to be able to turn the PID’s and timer power on and off rather than having them always on when the panel is powered on. I ended up abandoning this idea in the end, worrying that cramming 4 more switches on the front panel would just take up too much room. Lastly, I chose to use different models for the PID and timer parts.
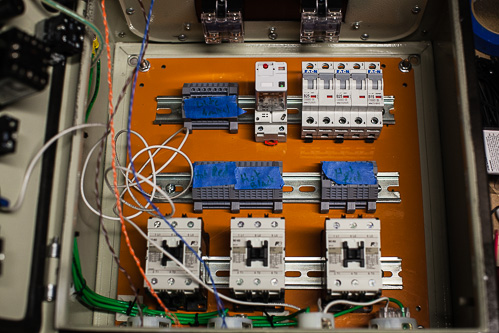
I also changed the some of the control panel internals. Rather than mount all of the internal components directly to the panel backplane, I decided to use a DIN rail mounting system. In this system, standard metal rails are secured to the back of the panel and then DIN compatible components simply snap onto the rail. This system it would make it a bit easier if I ever want to make internal upgrades or reconfigurations later on. It also allowed me to use a more modular style of connector system to replace the conventional terminal blocks. Also, rather than use fuses to protect the internal wiring, I decided to use circuit breakers. This is another area that is probably unnecessary overkill. However, it’s easier to reset a breaker than replace a fuse. I’ve also seen a number of other system diagrams that use similar circuit breakers. Once again, the DIN rail makes them easy to add so it was an easy decision. Since I got rid of the amp and volt meters, I was also able to leave out the DC transformers and shunt required to drive them. This gave me a bit more room to organize the inside and I was able to move the octal relay from the door to the back of the panel with the rest of the internal components.
The third major system design change was in the boil kettle. There a lot of differing opinions and options when it comes to filtering kettle trub. The Electric Brewery opted to use the hop stopper, a large flat round mesh screen surrounding the dip tube inside the kettle. Given my experience of clogging with the mesh bazooka screen, I was very hesitant to use a mesh screen solution again. Instead I opted to install an extra port on my boil kettle and perform a whirlpooling step prior to chilling. The whirlpool works to concentrate all of the kettle trub into a cone in the center of the kettle away from the pickup tube that the wort is drained from.
Sourcing
When it comes to purchasing parts, there are quite a few options. The Electric Brewery has partnered with a vendor to sell a number of the components including various kits and even completely assembled control panels. If you don’t want to deal with the headache of sourcing lots of individual parts or just want to spend less time building, this is a great option. After factoring in all of the shipping costs from multiple vendors you could end up saving money this way. There is also the risk of ordering the wrong components when trying to piece a system together from lots of separate vendors. With a kit, you’ll know you’re getting exactly the components you need. With my modifications in mind, I decided to source everything myself instead. Luckily, The Electric Brewery does a good job of suggesting links to multiple vendors for each of the individual parts.
One very common place to shop for parts is eBay. If you’re thrifty and take the time to hunt, you might be able to save a bit of money this way. The drawback to this is that sometimes it takes a lot of time hunting for the right auction to show up with the right part at the price point you want. It can also be difficult to tell from the descriptions what you might actually be getting. There is always the chance that the specs of the actual item are wrong or that the quality of the part is very low. I used eBay for only a very few parts that I couldn’t easily find elsewhere or that I could easily assure the quality of. Items like heat shrink tubing and braided sleeving, power cabling, and the control panel enclosure were all easily found on eBay.
When it came to actual electrical components, I went with a trusted vendor instead. Auber Instruments has a good selection of quality parts available and are a popular vendor in the homebrewing community. All of my switches, lights, PID’s, timers, SSR’s and temperature sensors were ordered from them. They also sell a pre-drilled heat sink that fits well for the control panel. I had to look elsewhere for the various DIN rail mounted components that I needed. For this I turned to Automation Direct. There, I found all of the relays, terminal blocks, contactors, and circuit breakers that I needed. Amazon was also a good source for many miscellaneous parts and tools. Everything from plugs, receptacles, heating elements, drill bits, punches, cable ties and more can be found there. Combined with a Prime membership giving me free two day shipping, this was often the first place I turned.
McMaster-Carr has a huge catalog of parts over a wide range of categories. When it comes to the kettle plumbing, there are a few pieces that can be difficult to find from any other vendor. Specificly sized high temperature o-rings, stainless steel washers, and other fittings can be found there. Most of the other stainless steel fittings are much more common and can be easily gotten from other sources. Quick disconnect components, ball valves, and other common plumbing parts all came from my regular LHBS, MoreBeer. My last source for assorted bits of wiring, nuts, bolts, connectors, paint, et cetera was my local Home Depot and neighborhood Ace Hardware stores.
Conclusion
With all of the planning done and the parts sourced, the next step is to actually start assembling the pieces into something functional. The details of the build will be covered in the next post. In the meantime, here’s the Full Build Image Gallery.