It’s been a few months since my last brew. Since then, I’ve moved into a new apartment (to be closer to my brewing assistant, of course). While I still have the kitchen space and stove capacity to do my brewing inside, I’ve decided to move my brewing out of the kitchen and into the back yard. This means yet another round of upgrades to my equipment – and one of the biggest investments in new gear to date.
This is my second major brewhouse upgrade. The first upgrade included an MLT and larger brew kettle, allowing me to move into the world of al-grain brewing. With that also came an extra 2-3 hours devoted to each brewing session. Part of this is due to required mash time that can’t be factored out, but I know there are some other time inefficiencies in my process that I can fix. With this in mind, my goal for this set of upgrades is to address some of these issues and to begin automating some of my processes. Hopefully some of these changes will eventually lead to better recipe reproducibility and ultimately a better finished product.
To start with I’ve identified a few weak points in my process that can be easily improved. My primary focus is on the heating and cooling of liquids. Even though I’ve been lucky enough to have access to a nice gas kitchen stove top, there is still a significant lag time involved in heating 5-7 gallons of liquid to a boil. It also takes a long time to passively cool this same volume using only an ice bath.
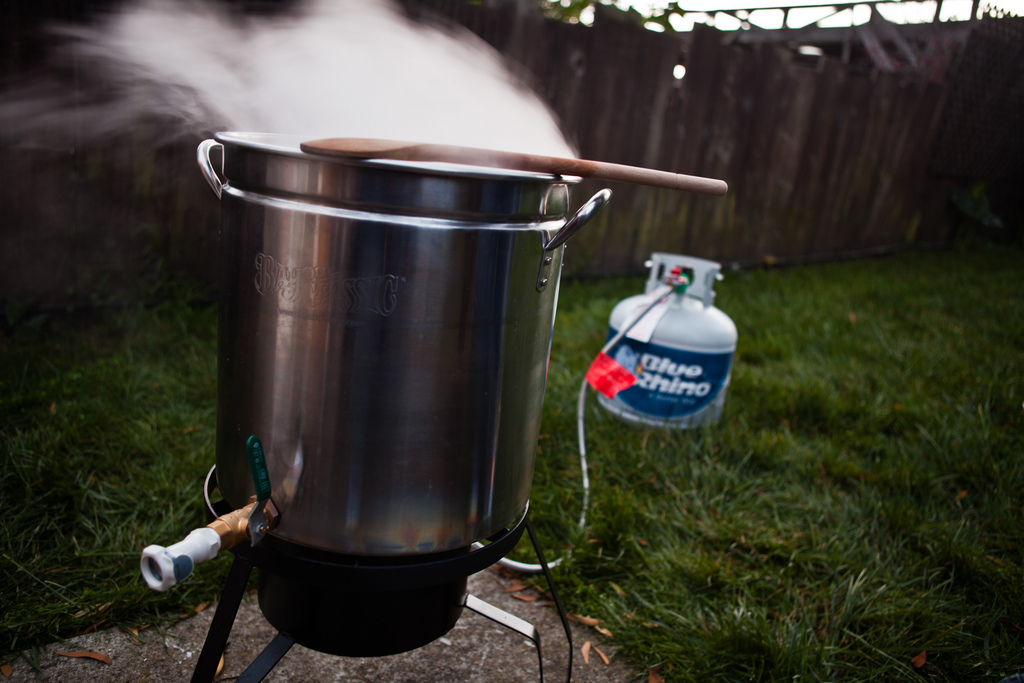
First, I’ll be adding a propane burner and tank to replace the kitchen stove. A dedicated high-pressure propane jet burner will provide a significant BTU boost and reduce the amount of time needed to boil all of the water and wort volumes I have to work with. Next, adding an active wort chiller will significantly reduce how long I’ll be waiting for the wort to cool before being able to pitch the yeast. That’s also less time that the wort spends in the dangerous temperature zone where it is most susceptible to contamination.
There are three primary wort chiller designs. All three are based on the same heat exchanging principle. Hot wort and cold water are passed across a thin copper metal membrane with the heat being transferred from the hot liquid into the cooler liquid. The first design is an immersion chiller – a large copper coil with cold water circulating through it is immersed directly into the kettle of hot wort. Next, is a design which encases the copper coil inside of another hose. Instead of immersing the chiller into the wort, the wort is pumped through the inner copper coil while cold water is pumped through the outer jacket. The final design is known as a plate chiller. Resembling the size and shape of a common house brick with hose connections on its top surface, this design uses a stack of rectangular brazed copper plates to provide the greatest possible surface area for heat exchange to take place in the most compact amount of space. Common plate counts range from 10-40 plates.
Up to now I’ve been hesitant to move to using an active wort chiller. While I know there are kitchen faucet adapters, I’ve been concerned about the amount of water I’ll be wasting in the cooling process. However, after research I’ve concluded that the amount of extra water I’ll be wasting isn’t significant enough to worry about. I can also collect some of this runoff to use for cleanup. I’ve chosen to use a plate chiller design containing 30 plates. This is the most compact and efficient cooler design and should require the least amount of cooling water to do its job.
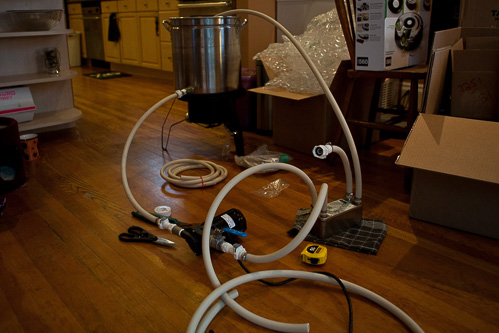
Finally, everything will be connected together with one final series of plumbing upgrades. My boil kettle will be fitted with a weldless ball valve assembly and the inner bulkhead will be attached to a mesh steel hop strainer. A magnetic drive high temperature march pump will be used to facilitate transferring hot liquid between various vessels throughout the brewing process. The connections between the kettle, pump, and chiller will be managed using 1/2” high temperature hoses outfitted with polysulfone quick disconnect fittings.
Build & Brew
Before placing an order with Northern Brewer for all of the various fittings I’ve spent a bit of time in photoshop creating diagrams of how each of the parts will fit into the overall system. This greatly simplifies the task of knowing what parts I need to order and helps make sure I don’t inadvertently leave anything out. Once the parts arrive I’m able to refer to these reference images again to facilitate assembling the pieces in the correct sequence.
As with most aspects of the brewing world there is no one right way to do things. Especially in the homebrew segment, the DIY ethos is strongly encouraged and embraced. This can make things challenging if you’re dealing with an unfamiliar subject. When you’re building your brewing system, it’s easy to find lots of opinions and advice on how to do it. Ultimately, you have to decide what works best for your needs. Of course, those needs will change as your brewing evolves and you should be prepared to modify, adapt, and extend your systems to match that growth.
At last, the parts arrive. I tediously drill, tape, assemble and test all of the new components. Everything looks good and the brew day is here. This is a monumental session with a lot of new unknowns. For as seemingly complicated as my setup has gotten, everything goes amazingly smoothly. Heating water and wort progresses in less time once I get the hang of running the new burner. The pump makes moving liquid through the pipeline a breeze. There is only one instance when I momentarily have trouble getting the pump primed and flowing. There are no sparging issues. The chiller is able to cool the wort down in a fifth of the time of my usual ice bath procedure while using only around ten gallons of water.
Shambler Amber Ale
Batch #8 – All Grain #4
Brewed: 11-06-10
Grain Bill
- 8# Pale 2 Row
- 1# Rye
- 1# Flaked Rye
- 8oz Biscuit
- 4oz Roasted Barley
Hop Schedule
- .25oz Columbus 14.8% AA @ 60 minutes
- .33oz Chinook 12.6% AA @ FWH
- .33oz Cascade 6.4% AA @ 0 minutes
Yeast
- WLP001 California Ale
Brew Stats
- Boil: 60 minutes
- Mash: 60 minutes
- Mash Volume: 3.5gal
- Mash Temperature: 154°
- Sparge Volume: 4gal
- Sparge Temperature: 168°
Vitals
- O.G.: 1.040
- F.G.: 1.009
- A.B.V.: 4%
- IBU: 32.7
- Efficiency: 53%
I seem to do a good job of hitting all of my temperatures and volumes. Still, I’ve made a few mistakes along the way. I get distracted and fail to get an accurate measure of the pre or post boil volumes. I don’t remember to get a pre-boil gravity reading. I forget to add whirlfloc as a fining agent near the end of the boil to clarify the wort.
When I finally measure the original gravity at the end of the session, I discover that I’ve come in significantly below my target gravity. Since I missed measuring a couple of key data points in the process, it’s a bit of a guess as to what exactly went wrong. Once clue came when I went to clean the spent grain out of my mash tun. I noticed many whole uncrushed grain kernels left behind. My suspicion is that my LHBS has done a terrible job of milling my grains. With so many new variables added this time and a few missing data points, I might not ever know for sure. Just to be sure, I’ll make sure to do the milling myself next time.
Another deficiency that has become apparent is the amount of steps I’m continually forgetting in the process. To address this, I’m planning on creating a worksheet to use for future brews. This worksheet will include all of the recipe ingredients, quantities, temperatures, times and steps for the brew along with spots which can be used to record all of the data points throughout the session. Hopefully this will give me a solid guide so I won’t forget any important measurements or steps.
Final Thoughts
Primary fermentation only takes about three days to finish off. Given my disappointment with efficiency, I don’t have a lot of confidence with this brew and decide to skip secondary and go directly to keg after only 6 days. In that period of time, the gravity has gone from around 1.040 to 1.010. The final calculation is not quite 4% ABV from around 53% efficiency. Finally, I’ve decided to force carbonate the keg at 20 PSI for 24 hours before dropping the PSI down to a more reasonable serving pressure around 12 PSI.
I learned a lot of new things here. My equipment upgrades have altered my brewing procedures in significant ways. Despite the issues, I’ve also turned out a drinkable brew from kettle to glass in around seven days. This is record time compared to a previous average time probably closer to a month or more. Even with mistakes I’ve ended up with something wholly drinkable. As it continues to age, the rye character comes out even further. While I might not make this exact recipe again, I’ll definitely look for a way to work rye into a future recipe.