Batch #12 – All Grain #7
One of my favorite batches to date has been my Strong Scotch Ale all-grain recipe. One of the signature characteristics of most Scottish ales is a deep, rich malt profile. The flavors often a result of early century procedures producing kettle-scortched wort, modern day recreations are created from the caramelized reduction of the first runnings which is added back in with the rest of the wort at the end of the boil.
I’m revisiting the Scottish Ale style category, this time with a version of a Scottish Export / 80 Shilling Ale. As a last minute decision I’m also going to attempt another parti-gyle. My goal is an additional 3 gallon batch for my spare small carboy. This smaller variant will ultimately be destined for my new 10L (2.64 gallon) oak barrel. Hopefully this one will fare better than my last double batch attempt.
Starting Up
The plan almost last minute, it’s the morning of the brew session and I haven’t prepared a yeast starter. This particular vial of yeast has been sitting in the fridge for a few months possibly at some less than ideal temperature extremes. With maybe 7 hours before the wort is ready for pitching, armed with a fresh supply of DME and my stir plate I can still give the yeast a head start to ramp up and prepare for the main feast. The short time is’t ideal, but with two batches to feed questionable yeast, I hope the starter will improve my odds.
Preparing a starter is like making a miniature batch – boil water and DME together in a 10:1 ratio, cool, and pitch yeast. In this case I heated 1L of water in my Erlenmeyer flask directly on my gas kitchen stove, adding 100g of DME near boiling. In theory, pretty simple – and only slightly more complicated in practice.
DME is a fine powder until it comes into the presence of moisture when it begins to quickly clump. Attempting to add it directly into the narrow top of the flask turned out to be a poor choice. It also turns out to be very easy to boil over in a flask. Once the mixture reaches boiling point, a careful eye must be kept to prevent excessive foam ups from making a huge mess all over the stove.
Despite minor blunders, the yeast was finally pitched into the cooled starter solution. A folded piece of aluminum foil wrapped around the opening of the flask would keep dust out while still letting oxygen in. Finally, after a bit of adjustment, I had the stir plate dialed in to keep the stir bar spinning and provide a constantly aerated source of wort for the yeast to feed on.
Milll and Mash
While I was extremely happy with the overall performance of the inaugural run of my brand new Monster Mill with the last batch, I felt I could still get better efficiency with a finer grain crush. Originally, I tuned it to the factory default setting of 0.045”. This time I decided to tighten the gap between rollers down to 0.040”. I also wanted to try using a drill to turn the mill instead of using the hand crank. Unfortunately, the drill didn’t have quite enough power to keep the mill spinning. I was able to use it for part of the bill, but ultimately finished up the last bit of grain by hand. Still, when the drill was running it made short work of what was in the hopper.
The mash went smoothly. I did a 15 minute tun preheat, this time using slightly hotter water than last time. Following the recommended strike temperature I was able to hit my target mash temperature. With around 20 minutes left in the mash, I started preheating the sparge water. As the timer came to an end, so did the roar of the propane burner. I had just finished up my very first tank of propane. Jennie rushing to my rescue, I was able to exchange for a full propane bottle in short order. After a short delay and slightly extended mash I was back on track with the sparge and boil.
Parti-gyle Take Two
My first attempt to turn a single mash into two different beers didn’t go well. While the first batch came out great, the second was a mess. Even after six months of aging it never really got to a drinkable state. I decided this time that I would reign in a couple of the variables that might have contributed problems last time. Instead of pulling out a random mix of leftover hops, I chose a hop profile similar to the primary batch (scaled down to match the smaller volume). I also did both boils back to back.
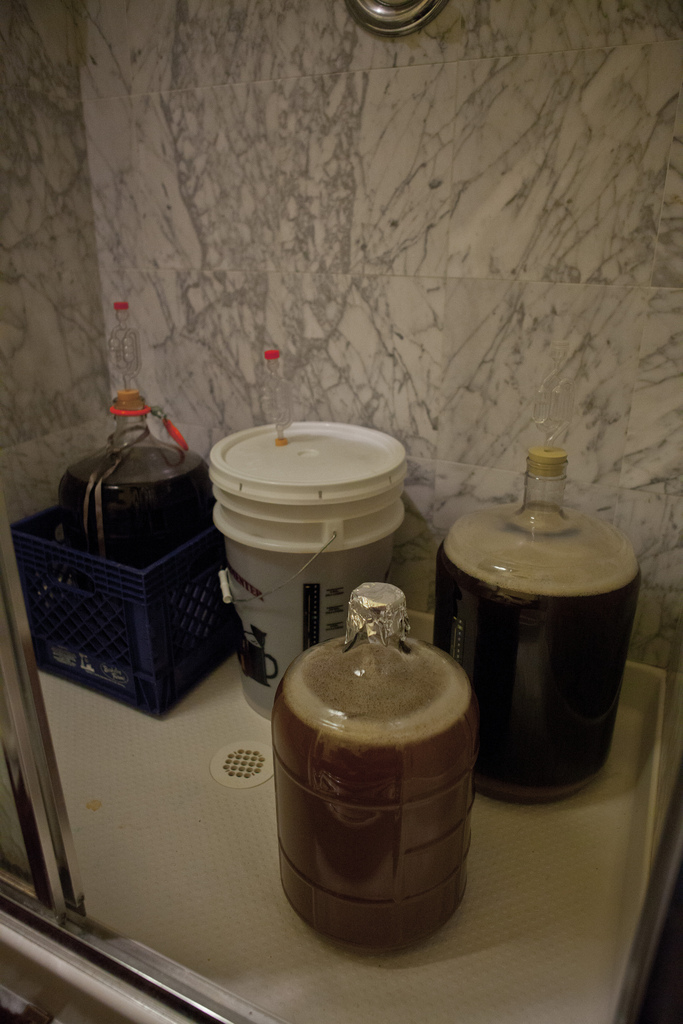
As usual, at first everything was looking good for this one. After transferring from kettle into the primary 3 gallon carboy, I discovered I was short a stopper and airlock. Instead I used a piece of foil to seal off the top of the carboy after pitching the yeast. I made sure my next online order included the missing bits and was able to swap out the foil for a proper airlock the following week. After about a week, I checked the gravity and found it all the way down to 1.006. Having forgotten to take any gravity readings prior to pitching, I wasn’t able to do any efficiency or ABV calculations.
At this point I noticed that the wort appeared to be a very watery pale yellow. The taste of the sample wasn’t exactly pleasant either with a very sharp woody flavor. It looked like this one may end up being another drain dump. Unfortunately, I needed the carboy to transfer my Raspberry Melomel (with its own currently disappointing flavor issues). So I made the decision to dump the contents of the carboy into my 10L barrel for further aging. I had my doubts that it would improve the situation, but at least it will keep the barrel wet until I had something better to fill it with.
Shill For Hire
Batch #12 – All Grain #7
Brewed: 02-13-11
Grain Bill
- 8.25# 2 Row Malt
- .75# Flaked Barley
- 7.2oz Crystal 40L Malt
- .25# Munich Malt
- 2.1oz Black Patent Malt
- 2oz Rauch Malt
Hop Schedule
- .75oz East Kent Goldings @ 60 minutes
- .5oz East Kent Goldings @ 20 minutes
Yeast
- WLP004 Irish Ale
Brew Stats
- Boil: 60 minutes
- Mash: 60 minutes
- Mash Volume: 12.5qt
- Strike Temperature: 170°
- Mash Temperature: 158°
- 1st Sparge Volume: 3gal
- Sparge Temperature: 170°
- 2nd Sparge Volume: 3gal
- Mash Efficiency: 73%
Vitals
- O.G.: 1.047
- F.G.: 1.010
- A.B.V.: 4.82%
- IBU: 25.8
Final Thoughts
I’m still not completely happy with my mash efficiency. 73% is probably better than what I’d get from a crush at my LHBS, but I think I might still get better results from an even smaller gap setting on my mill. I may adjust the setting down a few more tenths to 0.038” next time. I’ve also noticed a part of my process that can be improved with a slight equipment upgrade. When it comes time to run the hot wort through the heat exchanger, I’ve been ending up with more hoses to manage than I have hands for. Both the water and wort return lines have to be held in place since neither have disconnect fittings on them. It finally dawned on me that a second bulkhead installed at the top of my kettle along with a pair of quick disconnect fittings will solve the problem of having to manually hold the return hose over the kettle.
I also realize the importance of a fining agent in the brewing process. It’s been a while since I’ve remembered whirlfloc as an addition during the boil. Even though I’ve had the tablets in my inventory, I keep forgetting to include them in my recipes. This time I finally remembered to toss a half tablet in the kettle during the last 5 minutes of the boil. The difference is clear in my final hydrometer sample. There is good clarity compared to similar samples taken in the last few batches where I haven’t used the whirlfloc.
Somewhere in all of the inventory calculations I’ve managed to miscount the number of stoppers and airlocks I need in order to cap all of my fermenting vessels. I’m short a #7 stopper and an airlock for my last 3 gallon carboy. Since I’ve already committed to the batch and have the wort ready to go I compromise and cover the top of the 3 gallon carboy with a piece of aluminum foil. The next day, I have extra stoppers and airlocks on order. Even if they don’t arrive soon enough for this batch, I’ll be prepared for the next session.
I can’t say I’m terribly disappointed with this run. Compared to the last batch, evidence of fermentation was significantly sooner. I was able to see airlock activity within a few hours. Being able to use my new plastic carboy also allowed me to see what was going on. I can gauge the process by more than just airlock activity.
Tasting Notes
Update 05-17-11: I’ve had this one on tap for a few months now. I can’t say it’s nearly as good as I remember my first Scotch ale being. I don’t find a lot of smokiness coming through. I would definitely bump up the Rauch malt next time. I think that the Pacific Gem hops played a significant role in the flavor profile last time too. Overall, the final beer is definitely highly drinkable, but I’ll be looking to tweak the recipe a bit in the next iteration.