As I’ve slowly worked my way through various new styles and ingredients to experiment with, fruit has long been on my list. I’ve been looking forward to making a beer featuring cherries for nearly a year now. The idea first came to me after seeing fresh ripe cherries at a local farmers market one weekend. Unfortunately, it was already late in the season and by the time I was finally ready the opportunity for market fresh cherries had passed.
Fast forward to the following spring and I would be prepared for the next harvest. I had a recipe ready and had all of the ingredients on hand ahead of time. As soon as I began to see cherries at the farmers markets this year I knew it was finally time.
I chose a straightforward grain bill, consisting of a nearly 50/50 split of 2 row and white wheat malts plus a small percentage of light crystal malt. For hops, I initially chose Tettnang. However, these being more difficult to procure I fell back on the more readily available Czech Saaz. At just over 17 IBUs, the hops weren’t the star anyway. Any mild noble hop variety would work fine.
Fashionably late as usual, I prepped a liter yeast starter on the morning of the brew day, offering the yeast only about a six hour head start. It wouldn’t be doing much to bolster the cell count, but I hoped it would at least help the yeast ease into the main course.
As usual, this session was not without its share of mistakes. Near the end of the boil, the wind picked up threatening to blow out the flame on my burner and even succeeding a couple of times. I made it through the 60 minute boil, but with the extra flame outs I hadn’t reduced the total wort volume as much as I had originally anticipated. Not wanting to waste leaving the excess behind in the kettle, my carboy was nearly topped off with wort. It was questionable at this point whether the entire liter starter would fit in the remaining space.
When it came time to pitch the starter, less than half of the flask contents managed to fill the carboy the rest of the way up. Filled with a mix of apprehensive dread and just a little bit of morbid curiosity as to what sort of mess I was in for, I pressed on. I was committed to seeing through what must be an obvious string of bad ideas at this point. I went ahead and fitted in a stopper and blow off tube routed into a large plastic pitcher with a bit of star san in it.
I set aside the remaining portion of starter which hadn’t fit in the carboy and set about to a bit of rationalization. If fermentation hadn’t gotten started by the following morning or things were getting out of hand I could just siphon a bit of the excess out and pitch the remaining starter. Fortunately, the yeast did its job and the tube held, routing about a half gallon of blow off into the pitcher. Once the most vigorous fermentation had slowed a few days later and with enough head room I was able to safely replace the hose with an airlock.
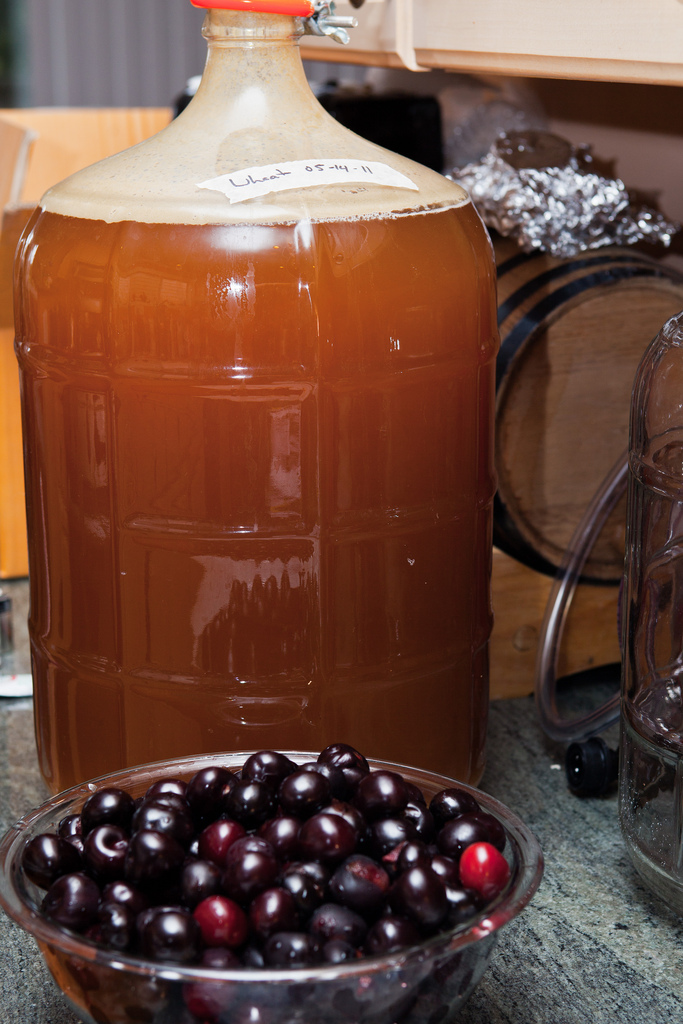
I would stock up on the cherries destined to go into the secondary container the following week. In the meantime I was faced with another moment of poor planning. I didn’t have an available secondary container to transfer the beer and cherries into. I had just moved my apocalyptic stout into my only bucket and I had just the one carboy free. Even my kegs were all full. This batch would completely fill my pipeline up and I would have nowhere to transfer it for the secondary phase. While an impromptu order placed with MoreBeer for a new 6 gallon bucket was a quick and easy fix to the situation at hand, it remains a valuable lesson in the proper capacity planning of the beer pipeline.
Cherry Wheat
Batch #16 – All Grain #11
Brewed: 05-14-11
Grain Bill
- 5# White Wheat
- 5# 4oz 2 Row
- 12oz 15L Crystal
Hop Schedule
- .75oz Saaz @ FWH
- .5oz Saaz @ 30 minutes
- .5oz Saaz @ 15 minutes
- .25oz Saaz @ 0 minutes
Yeast
Brew Stats
- Strike Temperature: 167°
- Mash Temperature: 155°
- Mash Volume: 13.75qt
- Sparge Volume: 2.5gal
- Sparge Temperature: 168°
Vitals
- O.G.: 1.051
- F.G.: 1.008
- A.B.V.: 5.6%
- IBUs: 17.4
Cherry Mash
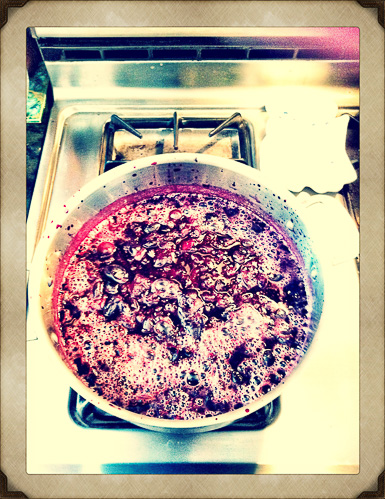
I tossed 5 pounds of cherries in the freezer the day before I was ready to work with them, thinking that the freezing would help kill any bacteria. Since I planned on heating them also, I’m not sure this step was really necessary. It may have just made the cherries a bit more difficult to work with.
First, I destemmed and pitted the half frozen cherries. Next, they went into a pot with two cups of water on the stove where they were heated to 180° and mashed up a bit further with a potato masher. They were then left to rest for about 45 minutes. Once the mixture had cooled enough, it was dumped into the sanitized secondary container and the beer was racked on top.
Clarification
When I transferred to keg, I went straight from the secondary bucket spiggot into the keg. As a result a lot of cherry pulp made it into the keg. I treated the keg with a tablespoon of gelatin mixed in a small amount of hot water. Hoping that the pulp would eventually clear out, I went ahead and force carbonated. It never really helped. I ended up with a nicely carbonated beer with a less than pleasant pulpiness to it.
I just needed a way to filter the beer out. The two most common approaches seemed to be plate and cylinder filters. Since I already had a cylindrical filter housing used for filtering brewing water, it made sense to simply modify my existing setup. All it would take was a new filter and some additional hose fittings to switch between the existing faucet connections and beer line connections.
The big problem I faced was that beer filtering is meant to be done on uncarbonated beer and here I had a full five gallons of fully carbonated beer. I was already several bad ideas deep into this brew and wasn’t about to let these little details deter me from making a few more. With some small modifications, I had a filter housing with a set of quick disconnect fittings that allowed me to interchange water faucet connections and keg beverage fittings.
I set up the full keg and connected it to an empty keg with the new filter setup in between. Then, I began the transfer doing my best to minimize foaming. By making adjustments to a pressure relief valve hooked up to the second fitting of the empty keg I was able to carefully monitor pressure and flow rate between the pair of kegs. The process seemed to go pretty smoothly if not a bit slow and with an inevitable amount of foaming throughout. I just hoped I hadn’t ruined the entire batch.
Final Thoughts
I’m sure the filtering problems probably had a large impact on the final quality of the beer. The filtering process undoubtedly contributed to some oxidation effect. This batch has definitely had some important take aways for my brewing career. Foremost, don’t be afraid to leave a little extra wort behind. A bit more careful and deliberate planning could go a long way. On the other hand, it just goes to show that there are a lot of mistakes that you can make along the way and still come out with ok beer. It might not be the greatest batch ever, but that’s just all part of the learning process.
I also initially thought that I might have used a little bit too many cherries. The cherry could stand to be a little less prominent. However, bottling and aging has helped to subdue the results a little bit. I’ve enjoyed it a bit more a few months later than I did initially. I’m definitely looking forward to experimenting with cherries again next season. I might even try a soured version next time. In the meantime, I still have a few bottles kept in reserve.